Friday, June 8, 2012

Steps to remove a domain from Weblogic Server


As of now there is no out of the box feature with Weblogic Configuration wizard to remove or delete a domain. These are basically manual steps.
For example if I want to delete a domain named geo_domain below are the steps you need to remove the domain.

  1. Open domain-registry.xml under $Middleware_HOME .Remove the corresponding entry referring to geo_domain.
CodeSnippet :: domain-registry.xml


  1. Open nodemanager.domains file under $Middleware_HOME \wlserver_10.3\common\nodemanager\ folder. Remove the corresponding entry referring to geo_domain.
CodeSnippet :: nodemanager.domains
#Domains and directories created by Configuration Wizard
geo_domain=C\:\\Oracle\\Middleware\\user_projects\\domains\\geo_domain


  1. Delete the domain folder under domains folder manually.
$Middleware_HOME\user_projects\domains\geo_domain


  1. Delete the domain folder under applications folder manually.
$Middleware_HOME\user_projects\ applications\geo_domain

Thursday, January 12, 2012

JBoss and PermGen OutOfMemoryError


The "PermGen" error happens, when the Java virtual machine runs out of memory in the permanent generation. Recall that Java has a generational garbage collector, with four generations: eden, young, old and permanent.

In the eden generation, objects are very short lived and garbage collection is swift and often.

The young generation consists of objects that survived the eden generation (or was pushed down to young because the eden generation was full at the time of allocation), garbage collection in the young generation is less frequent but still happens at quite regular intervals (provided that your application actually does something and allocates objects every now and then).

The old generation, well, you figured it. It contains objects that survived the young generation, or have been pushed down, and garbage collection is even less infrequent but can still happen.

And finally, the permanent generation. This is for objects that the virtual machine has decided to endorse with eternal life - which is precicely the core of the problem. Objects in the permanent generation are never garbage collected; that is, under normal circumstances when the jvm is started with normal command line parameters.

So what happens when you redeploy your web application is, that your WAR file is unpacked and its class files loaded into the jvm. And here's the thing: almost always ends up in the permanent generation... Because, seriously, who wants to garbage collect their classes?!? Well, apparently application servers do, and here's how we make that happen for JBoss, but the same configuration is applicable to other application servers, adding the following parameters to the bin/run.conf file at JAVA_OPTS line:

-XX:+UseConcMarkSweepGC -XX:+CMSClassUnloadingEnabled -XX:MaxPermSize=128m


Consider eventually tuning the MaxPermSize=128m part to fit your needs...

Tuesday, December 13, 2011

Ten Top Traits of Problem-Solvers


     Something we all seem to have in common is problems. Some see problems and give up immediately. Others thrash about or throw money at their problems with the predictable results that they continue without resolution, often getting worse. People carp, duck and hide, pull their hair, cry, or lash out, but their problem is seldom solved in a way that's best for all parties involved.
     People who solve problems seem to have several traits in common:

     #10 - Problem-solvers get a good fix on reality. They do not spend a lot of time in dreamland, wondering about what coulda been or woulda been if things were different. Things are not different -- problem-solvers know this and act accordingly.
     #9 - Problem-solvers do not gripe and do not make trouble for others.
     #8 - Problem-solvers are self-starters. They do not wait for someone else to point out there is something wrong. And they don't wait for someone else to tell them how to fix it.

     #7 - Problem-solvers do not keep lists of grievances. They may keep a few objective examples of a problem to use as evidence when problem-solving discussions arise.

     #6 - Problem-solvers engage their imaginations to come up with new solutions they can try out, and they have the guts to go forward as they test their solutions.

     #5 - Problem-solvers do not look to others for assurances that cannot be delivered. They know who does and does not make decisions, and try to work with those who do.

     #4 - Problem-solvers are nimble-minded, tough-love optimists who work tenaciously to solve the problems facing them.

     #3 - Problem-solvers are capable of allying themselves with others so that if a problem goes beyond their personal abilities, they can make use of the talents of others.

     #2 - Problem-solvers effectively juggle their entire load of problems so all get resolved. They don't let any one problem so dominate their attention (except in emergencies), that they can't multitask. Here they attend to one problem. A few minutes later they're busy solving another. They don't make everything else wait until something is solved completely. They work on multiple fronts as best they can.

     And the number one attribute:

     #1 - Problem-solvers go the extra mile to solve problems and to help others solve their problems. They value win-win solutions whenever they are possible.

     Are you a problem-solver?

Thursday, September 15, 2011

Comindware Task Management Solution

Comindware Task Management™ is powerful yet very easy to use FREE software to manage daily tasks appearing in your organization. The product is pre-integrated as a part of Comindware Tracker™ receiving and managing tasks appearing during your process execution along with your other tasks. Task tracking has never been so easy with user friendly interface and no hassle of managing complex solution for your task management.

Separate 

Separate different parts of your organization with exclusive Workspaces technology and start creating and managing Tasks for different parts of your organization in minutes.

Collaborate 

Collaborate. Organize your team work on Tasks through ongoing communication processes through comments and discussions. Attach and share files with a group you’re working with.


Follow tasks 

Follow Tasks and discussions you’re involved in.

Track execution 

Manage your schedule and track execution with Calendar, deadlines, notifications, and exclusive Task Schedule view.

Integration with outlook 

Stay productive working exclusively through MS Outlook interface you’re familiar with.


Sunday, August 7, 2011

Move Linux server to XenServer Host


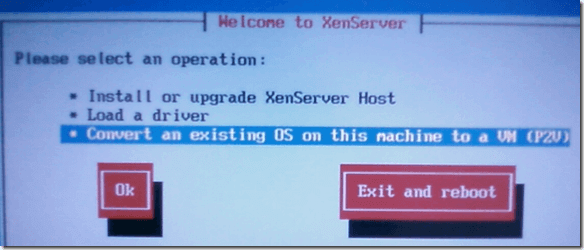
In order to P2V a Linux server to a XenServer host, you need to reboot the machine you want to convert and boot from the XenServer Installation CD. When you see the Welcome to XenServer screen, select OK and the installer will do some hardware detection, etc. After that, you will get four choices, one of them being
Convert an existing OS on this machine to a VM (P2V)
linux to xen server

And that’s it! Follow the rest of the prompts and the server will be virtualized. After it is complete, you will need to attach a VIF in order to have external network connectivity.

General Guidelines for Virtualizing Physical Servers

When considering how to best begin virtualizing a collection of physical servers, it is best to gain some comfort level and experience with virtualizing servers that are more simply configured, moving later to servers with more complex configurations.

Good candidates typically include servers that are used for test and development environments, and servers used for in-house IT infrastructure (intranet web servers, DNS, NIS, and other network services, etc.). Typically servers that are doing heavily CPU-intensive tasks (sophisticated mathematical modeling, video rendering) or are I/O-intensive (high-traffic commercial web sites, highly-used database servers, streaming audio/video servers) are not the best candidates for virtualization at the start.

Once you have identified some physical servers that seem reasonable to work on first, you should take a close look at how you are currently using them. What applications are they hosting? How I/O intensive are they? How CPU-intensive are they?

To make a reasonable assessment, you should gather a reasonable amount of data on the current physical servers that you are thinking about virtualizing. Look at system monitoring data for disk usage, CPU usage, memory usage, and network traffic, and consider both peak and average values.
Good candidates for virtualization are:
    •    servers whose CPU and memory usage and NIC and disk throughput are low will be more likely to coexist as a VM on a XenServer Host with a few other VMs without unduly constraining its performance.
    •    servers that are a few years old - so their performance as VMs hosted on a newer server would be comparable to their existing state.
    •    servers that do not use any incompatible hardware which cannot be virtualized, such as dongles, serial or parallel ports, or other unsupported PCI cards (serial cards, cryptographic accelerators, etc.).
Once you have identified a set of machines that you want to virtualize, you should plan the process to accomplish the task. First, provision the physical servers that will serve as your XenServer Hosts. The chief constraint on the number of VMs you can run per XenServer Host is system memory.
Next, plan how you will create the VMs. Your choices are to P2V an existing server, install a fresh server from network-mounted vendor media, or install a base operating system using a pre-existing template.
If you P2V an existing server, it's best to P2V a test instance of the server, and run it in parallel with the existing physical server until you are satisfied that everything works properly in the virtual environment before re-purposing the existing physical machine.
Next, plan how to arrange the desired VMs on the XenServer Hosts. Don't "mix up" servers - assign VMs to specific XenServer Hosts, giving consideration to complementary resource consumption (mixing CPU-intensive and I/O-intensive workloads) and complementary peak usage patterns (for instance, assigning overnight batch processing and daytime interactive workloads to the same XenServer Host).
For configuring individual VMs themselves, keep these guidelines in mind:

    •    create single-processor VMs unless you are serving a multi-threaded application that will perform demonstrably better with a second virtual CPU.

    •    when you configure the memory settings for a VM, consult the documentation for the guest operating system you plan to run in that VM and for the applications you plan to run on them.

Tuesday, July 26, 2011

Backup/Restore Mysql database


A simple approach on how to backup and restore MySQL databases.

Backup

To save an existing database it is recommended that you create a dump.
  • To dump all databases you must run the command:


mysqldump --user=****** --password=****** -A > /path/to/file_dump.SQL 
  • To dump several specific databases you must run the command:


mysqldump --user=****** --password=******  db_1 db_2 db_n> /path/to/file_dump.SQL
  • To dump all tables from a database you must run the command:


mysqldump --user=****** --password=****** db > /path/to/file_dump.SQL
  • To dump specific tables from a database you must run the command:


mysqldump --user=****** --password=****** db --tables tab1 tab2 > /path/to/file_dump.SQL


For each of the following commands you must specify a user (user) and password (password) with administrator rights on the database.

Restore your database

To restore a dump just launch the command:

mysql --user=****** --password=****** db_name < /path/to/file_dump.SQL


Note that

A database dump: is a record of the table structure and the data from a database, usually in the form of a list made of SQL statements.

Sunday, July 24, 2011

Change your Hostname without Rebooting in RedHat Linux


Original Article

This tutorial covers changing your hostname in RedHat Linux without having to do a reboot for the changes to take effect. I've tested this on RedHat , Fedora Core , and CentOS . It should work for all the versions in between since they all closely follow the same RedHat configuration.


Make sure you are logged in as root and move to /etc/sysconfig and open the network file in vi.
cd /etc/sysconfig 
vi network


Look for the HOSTNAME line and replace it with the new hostname you want to use. In this example I want to replace localhost with redhat9.

HOSTNAME=redhat9


When you are done, save your changes and exit vi. Next we will edit the /etc/hosts file and set the new hostname.

vi /etc/hosts


In hosts, edit the line that has the old hostname and replace it with your new one.
192.168.1.110  redhat9

Save your changes and exit vi. The changes to /etc/hosts and /etc/sysconfig/network are necessary to make your changes persistent (in the event of an unscheduled reboot).
Now we use the hostname program to change the hostname that is currently set.
hostname redhat9
And run it again without any parameters to see if the hostname changed.
hostname

Finally we will restart the network to apply the changes we made to /etc/hosts and /etc/sysconfig/network.
service network restart

To verify the hostname has been fully changed, logout of your system and you should see your new hostname being used at the login prompt and after you've logged back in.


Quick, painless, and you won't lose your server's uptime.